
Please take notes of the "IN-OUT" icons as shown in the pictures on the right. This cable can be used for dual purposes, i.e. for "IN" or "OUT" usage. The port holders can be turned 180 degrees to mark the ports either as "IN" or "OUT" function. |
RCA AUDIO L/R Internal
SPECIFICATIONS PRODUCT NAME
PRODUCT CODE
BAY USAGE
CONNECTORS
CABLE
Black: Audio Left (for Line-Out or Line-In)
The GND (ground) wire is fatter and can be easily recognized.
If you want to use CPX111-2 for line-out function, please read connection guides below:
Diagram 1: Simply plug the connector onto the audio header/pin-out, in such that; black wire is connected to L-Out L pin, red wire to L-Out R pin and the GND wire (fat black) to GND pin.
Diagram 2: If the 3 active pins are not located in one same row, you need to change the header connector, and rearrange the wires to match with the pin assignments.
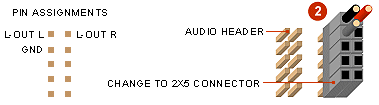
Diagram 3: To connect to IFPA (Intel Front Panel Audio) header, you need to change the header connector to 2x5, and rearrange the wires in such that; the black wire is connected to L-Out L pin, red wire to L-Out R pin, and the GND wire to GND pin. Your onboard rear speaker socket will no longer functional.
If you want to use CPX111-2 for line-in function, please read connection guides below:
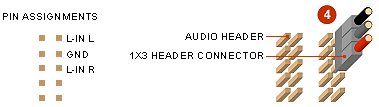
Diagram 4: Simply plug the connector onto the audio header/pin-out, in such that; black wire is connected to L-In L pin, red wire to L-In R pin and the ground wire to GND pin.
Diagram 5: If the 3 active pins are not aligned in one same row, you need to change the header connector, and rearrange the wires to match with the pin assignments.
On some motherboards, the line-in header is by itself, i.e. not grouping with the headphone and microphone pinouts. This line-in header is named as AUX, and consists of 4 pins arranged in 1 row. To connect to the AUX header, you can use the 1x4 header connector which can be purchased at our webstore. Please note that there are 2 GND pins in this header, just connect the ground wire to either one of the 2 GND pins, and leave the other GND pin unconnected. |
|
|
| ||
|
| ||


| DIY: panel cut-out & connector dimensions / DIY: installation guides |